Quantcast
Channel: Java-Phones.com
Viewing all 817 articles
Browse latest View live

Easy Method To Root OPPO N3 Without Computer

$
0
0

Great news for OPPO N3 user who were searching for the working rooting guide, now you can easily root with SuperSU tool which is very popular rooting Android smartphones. Oppo root tool now supports the N3, allowing users to install root, change system partition and use apps that require root permission such as Titanuim backup, Xposed and its modules.

Tutorial Root OPPO N3 Without Computer

  1. Download and install Oppo Tools on your device
  2. Run Oppo tools
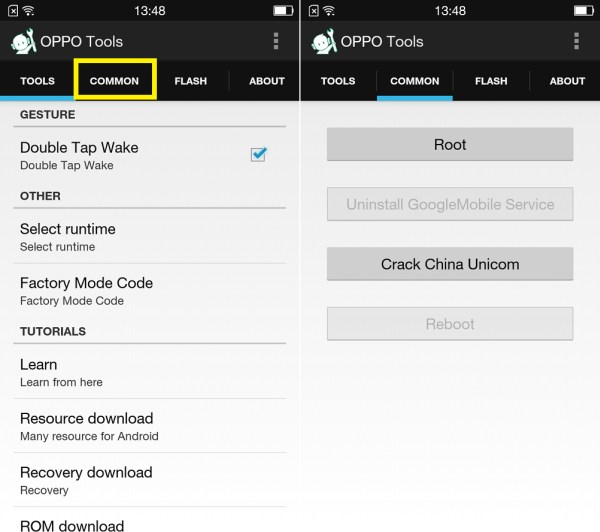
  3. There is some options tab (Tools, Common and Flash), tap at Common
  4. In Common option select Root, Oppo tools will ask you to install OppoToolsPugin application, tap on button to install
  5. After installation, Open it, and click One Key Root
  6. Wait until root process finish

IF the root is successful then an app named “SuperSU” will be installed on your phone.
You just rooted your OPPO N3. Any hurdles you faced during the whole walkthrough, let me know in the comments below. And I’ll mind if you don’t share this tutorial with your friends.(Remember sharing is caring!)


Port Camera and Gallery from One Plus One For All Android

$
0
0

Ever since the release of the OnePlus One, one particularly vaunted feature of One+ devices has been the “Camera Next” software. While the app was initially exclusive to the One+ One, it made its way to numerous other android devices with the Android 4.3 update.

This version for install like normal app (if you need to install to system app must extract lib .so from apk and paste to system/lib chmod 644)

About camera let try and report me what’s features work or not work for i will try to fix it if have problem. and this i mod camera on front interface to look like samsung s5
- Tutorial.
- Single shots.
- Burst shots.
- Video recording.
- Front-facing camera toggle.
- Swipe to open settings.
- Swipe to open gallery, which asks which gallery app you want to launch.
- Touch to focus toggle.
- Flash mode toggle.
- Shutter sound toggle.
- Geo-tag toggle.
- Double-flick wrist gesture to launch the camera anytime.
- Panorama mode.
- HDR mode.
- Slow-motion mode.

Screenshot

Download
Camera v.1
Gallery v.2

Port App Lenovo Super Camera v.4.1.3 For All Android

$
0
0

With the launch of Lenovo K900 at IFA 2013, the Lenovo Super Camera was revamped and given numerous new features to enhance the device’s photo and video capturing experience. But with the launch merely a fortnight ago, the app remains exclusive to the K900 for now, with its fate uncertain regarding whether older Lenovo will also partake in the update.

However, XDA Recognized has a fix for this quandary in the form of his port of the Lenovo Super Camera v.4.1.3, which is compatible with a large number of android phone running Jellybean or KitKat.

Download Lenovo Super Camera v.4.1.3

Easy Guide To Root OPPO R5 Without Computer

$
0
0

Oppo make some amazing smartphones that are popular in the Vietnam, India, Indonesia and other countries around the world. Their number one handset in the Oppo range at the moment is the OPPO R5 and today I’ll show you how to root it so you can tinker with the OS, install a custom recovery, custom ROM and root-only apps from Google Play.

Tutorial Root Oppo R5 Without Computer

  1. Download and install Oppo Tools on your device
  2. Run Oppo tools
  3. There is some options tab (Tools, Common and Flash), tap at Common
  4. In Common option select Root, Oppo tools will ask you to install OppoToolsPugin application, tap on button to install
  5. After installation, Open it, and click One Key Root
  6. Wait until root process finish
  7. Once you are granted the root privileges, root the smartphone manually yourself and the root is done.

How To Root OPPO R1S – Easy No PC

$
0
0

Javaphones presents guidelines on the best way to get the root on your OPPO R1S smartphone from the XDA Developers Forums. The methodology is easy and really simple. This feature demonstrates to you proper methodologies to root the Oppo Mirror3, yet the methodology is the same for pretty much any Android android from oppo such as Find 7, Mirror 3, OnePlus One and more. So in the event that you needed to root your OPPO R1S smartphone, take a minute and look at this feature.

Tutorial Root Oneplus One Without Computer

  1. Download and install Oppo Tools on your device
  2. Run Oppo tools
  3. There is some options tab (Tools, Common and Flash), tap at Common
  4. In Common option select Root, Oppo tools will ask you to install OppoToolsPugin application, tap on button to install
  5. After installation, Open it, and click One Key Root
  6. Wait until root process finish

You can check if you are rooted or not by installing Root Check app from playstore. And you will see success message in it. Henceforth install apps which require root access and enjoy. If you are struck anywhere then please feel free to comment. Do not forget to subscribe to the website for further development for OPPO R1S.

How To Install Android M Launcher On Lollipop & KitKat

$
0
0

Android M comes with a new launcher. Applications are now listed vertically in an alphabetical order. There is a search button at the top which makes it easier to find the application you want. The Android M launcher works on all Android devices running on Lollipop or KitKat. It has been tested on Samsung S4 Lollipop, stock Android but it should also work on HTC Sense and LG firmware.

How To Install

  • Download Velvet.apk and move it to your phone. Install the file.
  • Head over to the Play Store and search for Google Now Launcher. Install the launcher.
  • Press the home button. You will be asked to choose a launcher.
  • Choose the new Android M launcher and click always.

That’s all you have to do in order to get the Android M launcher on your Lollipop or KitKat device. Please note that you have to install the Velvet file, otherwise you will get stuck with the old launcher.

How To Change KingUser To SuperSU

$
0
0

If you was one of those who root their devices by using Kingroot or Vroot method and would like to remove chinese KingUser and KingMaster and related files. You can now replace it easily with SuperSU by following these instructions :

Disclaimer
This method is working on more devices but unfortunately not all

How To Replace

  • Download Replace_Kinguser_with_SuperSU-v1.8.zip
  • Extract “Replace_Kinguser_with_SuperSU-vx.x.zip” to: /sdcrad/ directory.
  • Open “Terminal Emulator” and type:
    su
  • Enter
  • Give root permission to the emulator by tapping Allow.
  • Type:
    sh /sdcard/mrw/root.sh
  • Enter
  • Once done, SuperSu App will launch automatically, if not launch it manually.
  • Update SU binary by tapping CONTINUE > NORMAL, don’t click TWRP/CWM, wait until it finish, then

Check your device’s App drawer, you will find that this tool replace Kinguser and related applications with SuperSU.
Download “Root Checker” App to check if your device still have root access or not.

Port Oppo Camera Mod For All Android

$
0
0

This camera uses dual flash and you can capture 4K videos with it. It is somehow a good way to enjoy 4K footage on your 4K TV. It includes some modes that we have not seen reportedly in previous model including the best shot. There is even a way to capture multiple shots at a time. If you have no plan to buy the colorOS, you can still enjoy the camera app of phone, thanks to senior XDA member infinityplus.

The developer has generated the ColorOS Camera apk file you can use on other Android devices. Download them from below link and give it a try on your non-oppo device:

Oppo Camera
Plugin

Plugins State:
Passerby Mode – Working
FilterCamera – Working
AudioCamera – Not Working
Double Exposure – Working
FaceBeautify – Working
GIF Mode- Working
HDRCamera – Working
Mircospur / Magnifier – Working
NightMode – Working
Panorama – Not working
Professional Camera – Working but manual focus is broken
RawPicture – Working
Slow Shutter – Working
Superzoom/HDCamera/Picture Plus – Working
UbiFocus / AfterFocus – Not Working
VoiceBeautify – Not Working

source


Sound Mod MAXX AUDIO + 11 Preset EQs

$
0
0

Audiophiles will be happy to know that the team at MAXX AUDIO has recently released a Lollipop-compatible version of their popular sound quality mod. With a custom sound driver that allows for fine-tuned equalization on all audio output methods, Viper Audio is a treat for your phone and your ears.

Download the MAXX Audio Mod

To install, copy the ‘com.lewa.tuningmaster-1‘ to /system/app, change folders to RWX-RX-RX and apk to RW-R-R, then reboot the phone.
After reboot, an application called ‘Tuning Master’ will show up.
As what you can see here, the installation process doesn’t replace/modify any of your system files, which means it can be uninstalled by simply removing the folders and might live along with your others audio mod just fine.

How To Install TWRP On LG G3 D851

$
0
0

After rooting your LG G3 D851 and playing around with the root-requiring apps, you might be wondering what else you can do to customize your device. Well, the real fun is here – with a custom recovery. Here’s how you can do that:

Heres this step

  1. Download Minimal ADB to your computer. It’ll be used to execute commands on your device.
  2. Download TWRP Recovery Image to your computer. It is the custom recovery image that will be installed on your device.
  3. Extract files from Minimal ADB to your computer by right-clicking on it and selecting Extract here.
  4. Head to Menu->Settings->Developer options on your device and turn on USB debugging.
  5. Plug in your phone to your computer using a USB cable
  6. Copy TWRP Recovery Image from your computer over to the internal SD card storage on your device.
  7. Launch a Command Prompt Window where the extracted ADB files are located. To do that, simply hold down Shift and right-click anywhere on your screen and select Open command window here.
  8. Type in the following commands into the Command Prompt Window. Make sure to replace RECOVERYNAME.img with the actual name of the recovery image that you have downloaded.
    adb shell
    su
    dd if=/sdcard/RECOVERYNAME.img of=/dev/block/platform/msm_sdcc.1/by-name/recovery
  9. Wait for it to install recovery on your device.
  10. When it’s done installing recovery, reboot your device.
  11. You’re all done!

TWRP Recovery is now up and running on the recovery partition on your shiny LG G3 T-Mobile.

Galaxy S6 Rom For Samsung Galaxy Alpha SM-G850F

$
0
0

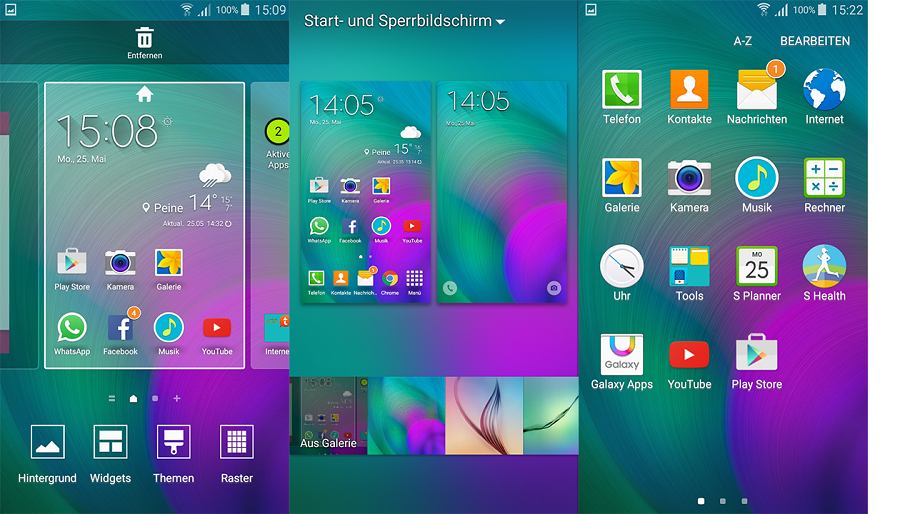
ECHOE ROM comes from DeathHawk and is also more similar to Samsung’s S6 TouchWiz User Interface. The ROM is based on Samsung Galaxy Alpha stock 5.0 ROM with several additions. Aside from that, you can either get the full version of the ROM or the slimmed down version with some bloatware removed. Both the versions are extremely fast, stable and battery efficient.


Pre-Requirements (Reading It Beforehand):
Please backup the original system data (contacts, SMS, application data, etc.).
Please backup files to another location as the built-in storage (external storage or individual PC).
Custom Recovery Installed On Your Device.
Phone Battery Charged Above 70% At Least.

Instructions (How To Flash/Install):
Download ROM Galaxy S6
Boot into Recovery.
Clear Data.
Clear Cache.
Clear Dalvik Cache.
Flash S6 ROM zip file
Reboot

Install Xperia Z3 Media Apps (No Needed Root)

$
0
0

Android users have already experienced the goodies from the new Xperia Z3, thanks to the developer community which shared the features via the system dump of the handset. However, thanks to our amazing developers, this thing is not a problem anymore. Developers have the knowledge to port apps from a newer phone to an older phone.

This is a port which has been released by senior XDA member Mahadeveloper. The port has been successfully tested on a number of Android devices including Nexus 5, Galaxy S4 and Galaxy Note 2.

Install all of these as normal apps (No root needed) or if you want to push into /system/app/.

How To Install TWRP & Root T-Mobile Galaxy S6 Edge on Android 5.1.1

$
0
0

The Android Lollipop has been rolled out to the Galaxy S6 (SM-G920T) and Galaxy S6 edge (SM-G925T) which is a moment of joy for the S6 users. However, the Lollipop update has raised issues with few of the popular rooting techniques but luckily there are some new methods to root the device. This post will be a tutorial on how to install TWRP recovery and root T-Mobile Galaxy S6 Edge on Android 5.1.1.

How To Install TWRP And Root T-Mobile Galaxy S6 Edge

  1. Download TWRP recovery, kernel and Odin3 to your computer then extract the both using any extracting tool.
  2. Double click Odin3 v3.10.6.exe.
  3. Click AP button to load the downloaded “G925T_UniKernel-TWRP.tar.md5″ file.Odin3 AP Firmware.tar.md5
  4. Enable OEM unlocking, Developer option > OEM unlocking.Galaxy S6 OEM Unlocling
  5. Turn off your phone then put it into download/odin mode.Samsung galaxy S6 / S6 Edge Download Mode
  6. Plugin your phone to PC via the original USB cable.
  7. If you have USB driver installed on your computer you will see Added!! in Log box and the ID:COM box will turn blue. If not please reinstall Samsung USB driver.Added and ID COM
  8. Click the Start button and wait few seconds.
  9. Once finished your device will reboot and Odin3 will display PASS!.All thread completed and PASS

Once booted you will find SuperSU application installed on your device if not download and install it from Google play store, check the root status by installed Root Checker App.

How To Install Flyme Launcher For All Android

$
0
0

Flyme Launcher takes things and turns them inside out. Instead of neat rows and boxes, Flyme Launcher gives you rings of the most commonly used apps and vertical cascades of categorized apps. It’s linked with the app manager too, so if you delete an icon, the app is deleted too. Simple and unique with a 4.6 star rating based on over five million installs.

If you own a non-Meizu device and have a desire to try the new Flyme Launcher from the MX5, you do not need to wait anymore. XDA member androidexpert35 has successfully ported a bunch of MX5 apps to work on almost all Android devices running Android OS version ranging from 5.0 Lollipop.

Image and video hosting by TinyPic

If you want to grab the ported Flyme launcher and widgets, just hit the download links below.
Flyme Launche – A Reay fluid, fast and beatifull launcher! Directly form FLyMe 4.5.2!

How To Root The ZTE Warp Without Computer

$
0
0

You can now root ZTE Warp easily without using PC but just using your mobile device. By rooting your device you can enjoy various additional benefits that your stock device can’t offer. You can overclock it, can install root only apps, can access and modify system files, can even upgrade to a customized Android version such as CM12 (Android 5.0.2 Lollipop based) or CM12.1 (Android 5.1.1 Lollipop based) custom ROMs (if anything available and) if you have a custom recovery installed.

How To Root The ZTE Warp Without Computer

  1. Download KingRoot and install it (open a file explorer, navigate your download and tap on it; you can also directly open the apk from browser download section to install it). If you see a warning box then you require to check Unknown sources under Settings –> Security.
  2. Once done, you should see the KingRoot icon in your App Drawer. Tap on the app icon to open it.
  3. Once the app is lunched, it will try to analyze your device to find suitable root process and soon you will see the following screen.
  4. Tap on ‘TRY TO ROOT’ or ‘START ROOT’ button that shown at the bottom of the screen.
  5. It will then start rooting your device. Sometime your phone may automatically restart during this process.
  6. Once completed you will see a big green tick that means your device is now rooted.

To confirm if you successfully rooted your Android device or not install an app called “Root Checker” which is available for free from Google PLAY store.


Port Meizu MX5 Camera

$
0
0

The new Meizu MX5 is still a couple of weeks from being released in the world, but that doesn’t mean we can’t play around with a few of its cool features. The leaked an APK of the Mx5′s camera app a few weeks back, which spread like wildfire across the interwebz. The camera shows off a minimalist and gesture-based user interface, something that many have wished for in a camera app, and today I’m going to show you how to get it on your Android smartphone running 5.0 lollipop.

This app isn’t available on Google Play, so you’ll need to have Unknown sources checked on your device. Enable it by going to Menu -> Settings -> Security and checking it.

Use this link to download the APK of the MX5 Camera. Once downloaded, click on it in the Notfication tray and Verify and install.

Meizu M1 Note Qualcomm Build.prop

$
0
0

# begin build properties
# autogenerated by buildinfo.sh
ro.build.id=KTU84P
ro.build.display.id=Flyme OS 4.2.0.2Q
ro.build.custom.internal.id=meizu_m71c.20150312.v1.0.01
ro.build.custom.internal.name=Meizu
ro.build.version.incremental=Flyme OS 4.2.0.2Q
ro.build.version.sdk=19
ro.build.version.codename=REL
ro.build.version.release=4.4.4
ro.build.version.internal=LLD8401_PreCS1.1.27.2_T27C0312_A_GY_B
ro.build.version.external=LLD8401.1.9_M016
ro.build.display.hardware=1.0
ro.build.accelerator.brand=rpi1040
ro.build.hardware.platform=ct820_pcb
ro.build.wifi.brand=atheros
ro.build.ideafriend.need=
ro.build.coolpadgene.need=
ro.build.lt.id=LLD8401_GY
ro.build.internal.type=GY
ro.build.operator.name=China Telecom
ro.build.autoregister.name=MZ-M463C
ro.build.device.name=m1cnote
ro.build.bluetooth.brand=qualcomm
ro.build.extstorage.type=EMMC_SDCARD
ro.build.gy.id=Flyme OS 4.2.0.2Q
ro.build.date=Thu Mar 12 03:44:43 CST 2015
ro.build.date.utc=1426103083
ro.build.type=user
ro.build.user=flyme
ro.build.host=ubuntu116
ro.build.tags=release-keys
ro.product.model=M463C
ro.product.ota.model=Longcheer CT820
ro.meizu.useflyme=true
ro.product.brand=Meizu
ro.product.name=m1 note
ro.product.device=m1cnote
ro.product.ctsdevice=m1cnote
ro.product.board=m1note
ro.product.cpu.abi=armeabi-v7a
ro.product.cpu.abi2=armeabi
ro.product.manufacturer=Meizu
ro.wifi.channels=
ro.board.platform=msm8916
persist.sys.fm=qn8035
# ro.build.product is obsolete; use ro.product.device
ro.build.product=m1note
# Do not try to parse ro.build.description or .fingerprint
ro.build.description=meizu_m1note-user 4.4.4 KTU84P m71c.Flyme_OS_4.2.20150312033938 release-keys
ro.build.fingerprint=Meizu/meizu_m1note/m1note:4.4.4/KTU84P/m71c.Flyme_OS_4.2.20150312033938:user/release-keys
ro.build.inside.id=4.4.4-20150312033938
ro.build.mask.id=4.4.4-1426102778
ro.build.characteristics=default
ro.build.phonenumber.minmatch=11
ro.build.network.type=evdo_gsm
ro.build.water.mark=
ro.build.dulemode=TRUE
ro.hardware.version=1.0
# end build properties
#
# from device/qcom/msm8916_32/system.prop
#
#
# system.prop for msm8916
#

#rild.libpath=/system/lib/libreference-ril.so
rild.libpath=/system/vendor/lib/libril-qc-qmi-1.so
rild.libargs=-d /dev/smd0
persist.rild.nitz_plmn=
persist.rild.nitz_long_ons_0=
persist.rild.nitz_long_ons_1=
persist.rild.nitz_long_ons_2=
persist.rild.nitz_long_ons_3=
persist.rild.nitz_short_ons_0=
persist.rild.nitz_short_ons_1=
persist.rild.nitz_short_ons_2=
persist.rild.nitz_short_ons_3=
ril.subscription.types=NV,RUIM
DEVICE_PROVISIONED=1
# Start in cdma mode
ro.telephony.default_network=5

debug.sf.hw=1
debug.egl.hw=1
debug.composition.type=c2d
persist.hwc.mdpcomp.enable=true
debug.mdpcomp.logs=0
#Enable translucent status bar feature
persist.hwc.ptor.enable=true
dalvik.vm.heapsize=36m
dev.pm.dyn_samplingrate=1
persist.demo.hdmirotationlock=false
debug.sf.gpu_comp_tiling=1

#ro.hdmi.enable=true
#tunnel.decode=true
#tunnel.audiovideo.decode=true
#lpa.decode=false
#lpa.use-stagefright=true
#persist.speaker.prot.enable=false

#
# system props for the cne module
#
persist.cne.feature=4

#
# system props for the dpm module
#
persist.dpm.feature=3

#system props for the MM modules
media.stagefright.enable-player=true
media.stagefright.enable-http=true
media.stagefright.enable-aac=true
media.stagefright.enable-qcp=true
media.stagefright.enable-fma2dp=true
media.stagefright.enable-scan=true
media.swhevccodectype=0
media.hwhevccodectype=0
mmp.enable.3g2=true
mm.enable.smoothstreaming=true
mm.disable.sec_smoothstreaming=true
media.aac_51_output_enabled=true
#codecs:(PARSER_)AAC AC3 AMR_NB AMR_WB ASF AVI DTS FLV 3GP 3G2 MKV MP2PS MP2TS MP3 OGG QCP WAV FLAC DIVX DIVXHD
mm.enable.qcom_parser=3407871

#
# system props for the data modules
#
ro.use_data_netmgrd=true
persist.data.netmgrd.qos.enable=true

#system props for time-services
persist.timed.enable=true

#
# system prop for opengles version
#
# 196608 is decimal for 0×30000 to report version 3
ro.opengles.version=196608

# System property for cabl
ro.qualcomm.cabl=2

#
# System props for telephony
# System prop to turn on CdmaLTEPhone always
telephony.lteOnCdmaDevice=1
persist.omh.enabled=false

#
# System props for bluetooh
# System prop to turn on hfp client
bluetooth.hfp.client=1

#Simulate sdcard on /data/media
#
persist.fuse_sdcard=true

persist.sys.strictmode.visual=false
persist.sys.strictmode.disable=true

#
#snapdragon value add features
#
ro.qc.sdk.audio.ssr=false
##fluencetype can be “fluence” or “fluencepro” or “none”
ro.qc.sdk.audio.fluencetype=rfecns
persist.audio.fluence.voicecall=true
persist.audio.fluence.voicerec=false
persist.audio.fluence.speaker=false
#Set for msm8916
tunnel.audio.encode = false
#Buffer size in kbytes for compress offload playback
audio.offload.buffer.size.kb=32
#use VERY_HIGH_QUALITY for audio resampler
af.resampler.quality=4
#Enable offload audio video playback by default
av.offload.enable=true
#enable voice path for PCM VoIP by default
use.voice.path.for.pcm.voip=true
#
#System property for FM transmitter
#
ro.fm.transmitter=false
#enable dsp gapless mode by default
audio.offload.gapless.enabled=true

#Audio voice concurrency related flags
voice.playback.conc.disabled=true
voice.record.conc.disabled=true
voice.voip.conc.disabled=true

#Set composition for USB
persist.sys.usb.config=mtp

#Set read only default composition for USB
ro.sys.usb.default.config=diag,serial_smd,rmnet_bam,adb

# set max background services
ro.config.max_starting_bg=8

#property to enable user to access Google WFD settings
persist.debug.wfd.enable=1
#propery to enable VDS WFD solution
persist.hwc.enable_vds=1

#PPPOE config enable
ro.config.pppoe_enable=1

#HWUI properties
ro.hwui.text_large_cache_height=2048

#property to enable narrow search range for video encoding
vidc.enc.narrow.searchrange=1

#
# ADDITIONAL_BUILD_PROPERTIES
#
persist.radio.multisim.config=dsds
dalvik.vm.heapstartsize=16m
dalvik.vm.heapgrowthlimit=256m
dalvik.vm.heapsize=512m
dalvik.vm.heaptargetutilization=0.75
dalvik.vm.heapminfree=4m
dalvik.vm.heapmaxfree=16m
keyguard.no_require_sim=true
ro.com.android.dataroaming=true
ro.carrier=unknown
ro.vendor.extension_library=/vendor/lib/libqc-opt.so
persist.radio.apm_sim_not_pwdn=1
ro.setupwizard.mode=DISABLED
persist.sys.language=zh
persist.sys.country=CN
ro.product.locale.language=zh
ro.product.locale.region=CN
persist.sys.timezone=Asia/Shanghai
ro.sf.lcd_density=480
persist.service.cdrom.enable=1
persist.usb.serialno=1234567890ABCDEF
persist.multisim.config=dsds
persist.nfc.smartcard.config=SIM1
persist.sys.emmc=/storage/sdcard0
persist.sys.switch_storage=emmc,0
persist.env.spec=Default
persist.radio.mode_pref_nv10=1
ro.flyme4.config=true
ro.meizu.product.model=M463C
ro.meizu.security=true
ro.meizu.setupwizard.flyme=true
ro.meizu.setupwizard.setlang=true
sys.meizu.white.config=false
ro.meizu.hardware.support=0×0
ro.build.product=m1note
persist.sys.usb.config=mtp
ro.build.device.ninur=64687
gsm.sim.imei=0
gsm.sim.meid=0
ril.ruim.identity=0
gsm.sim.esn=0
persist.sys.use.flyme.icon=true
ro.config.ringtone=Technology.ogg
ro.config.notification_sound=VideoRecord.ogg
ro.config.mms_sound=Triumph.ogg
ro.config.email_sound=VideoRecord.ogg
ro.config.calendar_sound=Doorbell.ogg
ro.config.alarm_alert=Morning_Dew.ogg
ro.meizu.sip.support=true
ro.meizu.voip.support=true
ro.meizu.has_smartbar=true
ro.qc.sdk.audio.fluencetype=rfecns
persist.audio.fluence.voicecall=true
persist.audio.fluence.voicerec=false
persist.audio.fluence.speaker=false
persist.radio.lte_full_band=1099511627781
ro.meizu.visualvoicemail=false
ro.customize.isp=chinatelecom
ro.build.cta=noncta
persist.sys.usb.mode=D3
ro.hwui.texture_cache_size=72
ro.hwui.layer_cache_size=50
ro.hwui.r_buffer_cache_size=8
ro.hwui.path_cache_size=32
ro.hwui.gradient_cache_size=3
ro.hwui.drop_shadow_cache_size=6
ro.hwui.fbo_cache_size=25
ro.hwui.texture_cache_flushrate=0.2
ro.hwui.text_small_cache_width=1024
ro.hwui.text_small_cache_height=512
ro.hwui.text_large_cache_width=2048
ro.hwui.text_large_cache_height=512
persist.sys.disable_blur_effect=false
persist.sys.static_blur_mode=true
persist.sys.disable_blur_view=true
persist.sys.ui.hw=true
persist.sys.logkit.ctrlcode=1
persist.sys.dalvik.vm.lib=libdvm.so
net.bt.name=Android
dalvik.vm.stack-trace-file=/data/anr/traces.txt
persist.gps.qc_nlp_in_use=1
persist.loc.nlp_name=com.qualcomm.services.location
ro.gps.agps_provider=1
ro.pip.gated=0
persist.radio.calls.on.ims=0
persist.radio.jbims=0
persist.radio.csvt.enabled=false
persist.radio.custom_ecc=1
persist.radio.rat_on=combine
persist.radio.mt_sms_ack=20

#
# Properties to overwrite (Default)
#

# disable “keep SIM alive” in LPM feature
#persist.radio.apm_sim_not_pwdn=0

# enable restoring mode_pref when manual select network with rat
persist.radio.restore_mode_pref=1

persist.env.c.phone.matchnum=11

# calculate voice rat when in LTE limited service
persist.radio.lte_vrte_ltd=1

# camera related properties
persist.camera.preview.size=0
persist.camera.capture.animate=1
persist.camera.tn.disable=0
persist.camera.tintless=enable
persist.camera.qcom.misc=0

Meizu m1 note Mediatek Build.prop

$
0
0

# begin build properties
# autogenerated by buildinfo.sh
ro.build.cta=noncta
ro.meizu.build.spt=0
ro.build.id=KTU84P
ro.build.mask.id=4.4.4-1428926638
ro.build.inside.id=4.4.4-20150413200358
ro.build.version.incremental=m71.Flyme_OS_4.2.0.5.20150413200358
ro.custom.build.version=m71.Flyme_OS_4.2.0.5.20150413200358
ro.build.version.sdk=19
ro.build.version.codename=REL
ro.build.version.release=4.4.4
ro.build.date=Mon Apr 13 20:38:57 CST 2015
ro.build.date.utc=1428928737
ro.build.type=user
ro.build.user=flyme
ro.build.host=mz-builder-4
ro.build.tags=release-keys
ro.product.cpu.abi=armeabi-v7a
ro.product.cpu.abi2=armeabi
ro.product.locale.language=zh
ro.product.locale.region=CN
ro.wifi.channels=
ro.board.platform=
ro.build.flavor=
ro.build.characteristics=default
ro.product.brand=Meizu
ro.product.manufacturer=Meizu
ro.build.display.id=Flyme OS 4.2.0.5A
ro.product.model=m1 note
ro.product.name=m1 note
ro.product.device=m1note
ro.product.board=m1note
# ro.build.product is obsolete; use ro.product.device
ro.build.product=m1note
# Do not try to parse ro.build.description or .fingerprint
ro.build.description=meizu_m1note-user 4.4.4 KTU84P m71.Flyme_OS_4.2.0.5.20150413200358 release-keys
ro.build.fingerprint=Meizu/meizu_m1note/m1note:4.4.4/KTU84P/m71.Flyme_OS_4.2.0.5.20150413200358:user/release-keys
# end build properties

# begin mediatek build properties
ro.mediatek.version.release=ALPS.KK2.MP13.V1.16
ro.mediatek.platform=MT6752
ro.mediatek.chip_ver=S01
ro.mediatek.version.branch=KK2.MP13
ro.mediatek.version.sdk=3
# end mediatek build properties
#
# from out/target/product/m71/obj/CUSTGEN/config/system.prop
#
#
# system.prop for generic sdk
#

rild.libpath=/system/lib/mtk-ril.so
rild.libargs=-d /dev/ttyC0

# MTK, Infinity, 20090720 {
wifi.interface=wlan0
# MTK, Infinity, 20090720 }

# MTK, mtk03034, 20101210 {
ro.mediatek.wlan.wsc=1
# MTK, mtk03034 20101210}
# MTK, mtk03034, 20110318 {
ro.mediatek.wlan.p2p=1
# MTK, mtk03034 20110318}

# MTK, mtk03034, 20101213 {
mediatek.wlan.ctia=0
# MTK, mtk03034 20101213}

#
wifi.tethering.interface=ap0
#

ro.opengles.version=196608

wifi.direct.interface=p2p0
dalvik.vm.debug=0×600

# USB MTP WHQL
ro.sys.usb.mtp.whql.enable=0

# Power off opt in IPO
sys.ipo.pwrdncap=2

#ifndef Flyme_EDIT
#zengxin@SHELL.Storage.Feature modify for “Meizu multiple external USB devices”
# Switching Menu of Mass storage and MTP
#ro.sys.usb.storage.type=mtp,mass_storage
#else
#Since we do not support UMS, remove it
ro.sys.usb.storage.type=mtp
#endif /* Flyme_EDIT */

# USB BICR function
ro.sys.usb.bicr=yes

# USB Charge only function
ro.sys.usb.charging.only=yes

# audio
ro.camera.sound.forced=0
ro.audio.silent=0

ro.zygote.preload.enable=0

#
# ADDITIONAL_BUILD_PROPERTIES
#
persist.gemini.sim_num=2
ro.gemini.smart_sim_switch=false
ro.gemini.smart_3g_switch=0
ro.gemini.sim_switch_policy=0
ril.specific.sm_cause=0
bgw.current3gband=0
ril.external.md=0
ro.btstack=blueangel
ro.sf.hwrotation=180
ril.current.share_modem=2
curlockscreen=1
ro.mediatek.gemini_support=true
persist.radio.fd.counter=15
persist.radio.fd.off.counter=5
persist.radio.fd.r8.counter=15
persist.radio.fd.off.r8.counter=5
persist.radio.fd.on.only.r8.network=0
drm.service.enabled=true
fmradio.driver.enable=0
ril.first.md=1
ril.flightmode.poweroffMD=1
ril.telephony.mode=0
dalvik.vm.mtk-stack-trace-file=/data/anr/mtk_traces.txt
persist.mtk.anr.mechanism=1
mediatek.wlan.chip=CONSYS_MT6752
mediatek.wlan.module.postfix=_consys_mt6752
ril.radiooff.poweroffMD=0
ro.com.android.dateformat=MM-dd-yyyy
ro.config.ringtone=Technology.ogg
ro.config.notification_sound=VideoRecord.ogg
ro.config.mms_sound=Triumph.ogg
ro.config.email_sound=VideoRecord.ogg
ro.config.calendar_sound=Doorbell.ogg
ro.config.alarm_alert=Morning_Dew.ogg
persist.mtk.wcn.combo.chipid=-1
ter.service.enable=0
mediatek.extmd.usbport=0
ro.lte.dc.support=0
ril.active.md=0
ril.read.imsi=1
wfd.dummy.enable=1
persist.sys.timezone=Asia/Shanghai
persist.sys.meizu.region=cn
persist.sys.meizu.codepage=gbk
ro.meizu.region.enable=true
ro.meizu.contactmsg.auth=false
ro.meizu.customize.pccw=false
ro.meizu.autorecorder=true
ro.meizu.visualvoicemail=true
ro.meizu.permanentkey=false
ro.meizu.sip.support=true
ro.meizu.voip.support=true
ro.meizu.setupwizard.flyme=true
ro.meizu.setupwizard.setlang=true
ro.meizu.security=true
ro.sf.lcd_density=480
ro.meizu.has_smartbar=true
ro.meizu.customize.internationalization=false
sys.meizu.m35x.white.config=false
sys.meizu.white.config=false
ro.flyme4.config=true
persist.sys.log-main.enable=0
persist.sys.log-system.enable=0
persist.sys.log-events.enable=0
persist.sys.log-radio.enable=0
ro.operator.optr=CUST
persist.sys.ui.hw=true
persist.sys.disable_blur_effect=false
dalvik.vm.heapstartsize=8m
dalvik.vm.heapgrowthlimit=128m
dalvik.vm.heapsize=512m
dalvik.vm.heaptargetutilization=0.75
dalvik.vm.heapminfree=512k
dalvik.vm.heapmaxfree=8m
ro.hwui.texture_cache_size=72
ro.hwui.layer_cache_size=50
ro.hwui.r_buffer_cache_size=8
ro.hwui.path_cache_size=32
ro.hwui.gradient_cache_size=3
ro.hwui.drop_shadow_cache_size=6
ro.hwui.fbo_cache_size=25
ro.hwui.texture_cache_flushrate=0.2
ro.hwui.text_small_cache_width=1024
ro.hwui.text_small_cache_height=512
ro.hwui.text_large_cache_width=2048
ro.hwui.text_large_cache_height=512
keyguard.no_require_sim=true
ro.meizu.product.model=m1note
persist.sys.meizu.dim.input=false
persist.sys.use.flyme.icon=true
persist.sys.dalvik.vm.lib=libdvm.so
net.bt.name=Android
dalvik.vm.stack-trace-file=/data/anr/traces.txt

Huawei Honor Play 4 Build.prop

$
0
0

# begin build properties
# autogenerated by buildinfo.sh
ro.build.id=HuaweiG620S-UL0
ro.build.version.sdk=19
ro.build.version.codename=REL
ro.build.version.release=4.4.4
ro.build.date=Fri Mar 13 11:22:36 CST 2015
ro.build.date.utc=1426216956
ro.build.type=user
ro.build.user=huawei
ro.build.host=huawei-desktop
ro.product.model=G620S-UL0
ro.product.brand=Huawei
ro.product.name=G620S-UL0
ro.product.device=hwG620S-UL0
ro.product.board=G620S-UL0
ro.product.cpu.abi=armeabi-v7a
ro.product.cpu.abi2=armeabi
ro.product.manufacturer=HUAWEI
ro.product.locale.language=en
ro.product.locale.region=US
ro.wifi.channels=
ro.board.platform=msm8916

ro.build.product=G620S-UL0

ro.build.characteristics=default
ro.build.hide=false
# end build properties
#
# from device/qcom/msm8916_32/system.prop
#
#
# system.prop for msm8916
#

#rild.libpath=/system/lib/libreference-ril.so
rild.libpath=/system/vendor/lib/libril-qc-qmi-1.so
rild.libargs=-d /dev/smd0
persist.rild.nitz_plmn=
persist.rild.nitz_long_ons_0=
persist.rild.nitz_long_ons_1=
persist.rild.nitz_long_ons_2=
persist.rild.nitz_long_ons_3=
persist.rild.nitz_short_ons_0=
persist.rild.nitz_short_ons_1=
persist.rild.nitz_short_ons_2=
persist.rild.nitz_short_ons_3=
ril.subscription.types=NV,RUIM
DEVICE_PROVISIONED=1
# Start in cdma mode
ro.telephony.default_network=9

debug.sf.hw=1
debug.egl.hw=1
debug.composition.type=c2d
persist.hwc.mdpcomp.enable=true
debug.mdpcomp.logs=0
#Enable translucent status bar feature
persist.hwc.ptor.enable=true
dalvik.vm.heapsize=256m
dev.pm.dyn_samplingrate=true
persist.demo.hdmirotationlock=false
debug.sf.gpu_comp_tiling=1

#ro.hdmi.enable=true
#tunnel.decode=true
#tunnel.audiovideo.decode=true
#lpa.decode=false
#lpa.use-stagefright=true
#persist.speaker.prot.enable=false

#
# system props for the cne module
#
# DTS2014060608314 zhangxinsheng 20140606 begin
persist.cne.feature=0
# DTS2014060608314 zhangxinsheng 20140606 end

#
# system props for the dpm module
#
#/*< DTS2014081404009 lishiliang 20140814 begin */
persist.dpm.feature=0
#/* DTS2014081404009 lishiliang 20140814 end> */

# /* < DTS2014053003338 caiying/00214377 20140530 begin */
#add for icos mirror z00200825 begin
ro.config.hw_multiscreen=1
persist.sys.wfd.sound=false
#add for icos mirror z00200825 end
# /* DTS2014053003338 caiying/00214377 20140530 end > */

#system props for the MM modules
media.stagefright.enable-player=true
media.stagefright.enable-http=true
media.stagefright.enable-aac=true
media.stagefright.enable-qcp=true
media.stagefright.enable-fma2dp=true
media.stagefright.enable-scan=true
mmp.enable.3g2=true
mm.enable.smoothstreaming=true
mm.disable.sec_smoothstreaming=true
media.aac_51_output_enabled=true
#codecs:(PARSER_)AAC AC3 AMR_NB AMR_WB ASF AVI DTS FLV 3GP 3G2 MKV MP2PS MP2TS MP3 OGG QCP WAV FLAC DIVX DIVXHD
mm.enable.qcom_parser=3407871

#
# system props for the data modules
#
ro.use_data_netmgrd=true
persist.data.netmgrd.qos.enable=true

#system props for time-services
persist.timed.enable=true

#
# system prop for opengles version
#
# 196608 is decimal for 0×30000 to report version 3
ro.opengles.version=196608

# System property for cabl
ro.qualcomm.cabl=0

#
# System props for telephony
# System prop to turn on CdmaLTEPhone always
# DTS2014060608314 zhangxinsheng 20140606 begin
#telephony.lteOnCdmaDevice=1
persist.omh.enabled=0
# DTS2014060608314 zhangxinsheng 20140606 end

#
# System props for bluetooh
# System prop to turn on hfp client
bluetooth.hfp.client=1

#
# dirty ratio value when enable UMS
#
ro.sys.umsdirtyratio=20
#Simulate sdcard on /data/media
#
persist.fuse_sdcard=true

#
#snapdragon value add features
#
ro.qc.sdk.audio.ssr=false
##fluencetype can be “fluence” or “fluencepro” or “none”
ro.qc.sdk.audio.fluencetype=none
persist.audio.fluence.voicecall=true
persist.audio.fluence.voicerec=false
persist.audio.fluence.speaker=true
#Set for msm8916
tunnel.audio.encode = false
# DTS2014052707055 yufei 20140527 begin
# disable low ram feature
#ro.config.low_ram=true
# DTS2014052707055 yufei 20140527 end
#Buffer size in kbytes for compress offload playback
audio.offload.buffer.size.kb=32
#use VERY_HIGH_QUALITY for audio resampler
af.resampler.quality=4
#Enable offload audio video playback by default
av.offload.enable=false
#enable voice path for PCM VoIP by default
use.voice.path.for.pcm.voip=true
audio.offload.pcm.enable=false
audio.offload.disable=1
#
#System property for FM transmitter
#
ro.fm.transmitter=false
#enable dsp gapless mode by default
audio.offload.gapless.enabled=true

#Audio voice concurrency related flags
voice.playback.conc.disabled=false
voice.record.conc.disabled=false
voice.voip.conc.disabled=true

# remove System prop for USB configuration
#Set composition for USB
#persist.sys.usb.config=diag,serial_smd,rmnet_bam,adb

#Set read only default composition for USB
ro.sys.usb.default.config=diag,serial_smd,rmnet_bam,adb

# set max background services
ro.config.max_starting_bg=8

#property to enable user to access Google WFD settings
persist.debug.wfd.enable=1
#propery to enable VDS WFD solution
persist.hwc.enable_vds=1
ro.min_freq=800000

#PPPOE config enable
ro.config.pppoe_enable=1

ro.config.hw_camera_zsl=true
ro.config.hw_camera_zsl_default=true

#
# ADDITIONAL_BUILD_PROPERTIES
#
persist.nfc.smartcard.config=SIM1,SIM2,eSE1
dalvik.vm.heapgrowthlimit=96m
keyguard.no_require_sim=true
ro.com.android.dataroaming=true
ro.com.android.dateformat=MM-dd-yyyy
ro.config.ringtone=Ring_Synth_04.ogg
ro.config.notification_sound=pixiedust.ogg
ro.carrier=unknown
ro.config.alarm_alert=Alarm_Classic.ogg
ro.setupwizard.mode=OPTIONAL
ro.com.google.gmsversion=4.4_r5
ro.vendor.extension_library=/vendor/lib/libqc-opt.so
persist.radio.apm_sim_not_pwdn=1
dalvik.vm.heapstartsize=8m
dalvik.vm.heaptargetutilization=0.75
dalvik.vm.heapminfree=2m
dalvik.vm.heapmaxfree=8m
persist.sys.logkit.ctrlcode=1
persist.sys.dalvik.vm.lib=libdvm.so
net.bt.name=Android
dalvik.vm.stack-trace-file=/data/anr/traces.txt
persist.gps.qc_nlp_in_use=1
persist.loc.nlp_name=com.qualcomm.services.location
ro.gps.agps_provider=1
ro.pip.gated=0

ro.build.user.replace=andorid
ro.build.host.replace=localhost
ro.product.board.replace=G7-UL00
ro.product.device.replace=hwG7-UL00
ro.product.model.replace=HUAWEI G7-UL00
ro.product.name.replace=G7-UL00
ro.product.manufacturer.replace=HUAWEI
ro.build.id.replace=HuaweiG7-UL00
ro.product.brand.replace=Huawei
ro.hardware.replace=qcom
GL_RENDERER.replace=Andreno(TM)305
GL_VENDOR.replace=Qualcomm
ro.build.hide.resolution=540 x 960
audio.legacy.postproc=true
wifi.interface=wlan0
ro.bluetooth.remote.autoconnect=1
ro.emmc.sdcard.partition=true
ro.com.google.clientidbase=android-huawei
ro.config.hw_power_saving=true
ro.config.hw_isCustomize=false
ro.config.hw_customizeType=
ro.config.colorTemperature_K3=true
ro.sf.lcd_density=320
ro.config.hw_eapsim=true
ro.config.hw_tether_dun_enable=true
ro.config.internal_sdcard=true
ro.dual.sim.phone=true
net.tcp.fin.aggregation=3600000
ro.max.fling_velocity=4000
dev.pm.dyn_sample_period=true
hw.cabl.level=2
hw.cabl.version=1.0.20120512
ro.config.hw_music_dts=true
ro.hw.usempdp=false
net.tcp.buffersize.1xrtt=3600000
net.tcp.buffersize.evdo=3600000
net.tcp.buffersize.evdo_b=3600000
net.tcp.buffersize.ehrpd=3600000
ro.config.hw_is24HourHasZero=false
ro.config.app_big_icon_size=112
ro.config.hwecc_feature=true
ro.config.nfc_switch=1
persist.camera.longshot.enable=0
ro.config.remove_hisuite=true
ro.config.hw_audio_plus=true
ro.config.hw_CustVibrateDur=0,10,20,40
ro.config.keypasstouser=true
ro.mmi.mn.keypad_light=false
ro.mmi.as.keypad_light=false
ro.mmi.ms.keypad_light=false
ro.mmi.aas.keypad_light=false
ro.product.member.level=10010
ro.config.hw_voicerecord=true
ro.config.callrecord.enabled=1
ro.config.hw_wifi_download_xtra=true
qemu.hw.mainkeys=1
ro.config.hw_wirenetcontrol=true
ro.hwcamera.frontPanorama=true
ro.hwcamera.frontPanorama.px=2m
ro.hwui.texture_cache_size=20
ro.hwui.texture_cache_flushrate=0.4
ro.hwpp.sig_smooth_algo=true
persist.radio.force_nw_search=1
persist.radio.use_nv_force=false
ro.config.ign_spn_CN_NW=true
ro.hwpp.cust_ons_bin=true
ro.config.hw_roaming_optimize=true
ro.config.force_reject_cause=true
ro.config.AC_optimize_plmn_srch=true
ro.config.spare_ntp_server=asia.pool.ntp.org
ro.hwpp.cust_sigbar_lte=4,false,-120,-113,-105,-97
ro.config.NW_rescan_after_rej=true
persist.radio.rat_on=combine
ro.config.nostore_nw_sel_mode=true
ro.config.hw_nv_security=true
ro.config.hw_lteumts=true
ro.multi.rild=true
ro.config.dsds_mode=umts_gsm
persist.radio.multisim.config=dsds
persist.dsds.enabled=true
persist.data.ds_fmc_app.mode=0
net.dns.cache_size=512
net.dns.cache_ttl=600
net.http.getzip=1
net.http.idle_cache.shutdown=true
net.http.idle_cache.size=40
net.http.threads=10
net.nw.cache.orderby=weight
net.nw.cache.prioadvstep=86400000
net.nw.cache.weightadvstep=3600000
ro.hwpp_dorecoverylevel=1
ro.hwpp_ds_fail=111,-3,30
ro.config.hw_fast_dormancy=true
ro.config.hw_enableFD_nwNot=true
ro.config.hw_USB_on_enable_FD=true
ro.config.hw_fdtimer_screenOn=-1
ro.config.hw_fdtimer_screenOff=3000
ro.config.hw_always_allow_mms=true
ro.config.hw_data_reset=true
persist.ims.regmanager.mode=0
ro.hwpp.disable_IA=true
ro.config.hw_release_optimize=true
ro.config.emergencycall_show=true
ro.config.hwft_MatchNum=11
ro.config.hwecc_feature=true
ro.config.hwft_simrefresh=true
persist.atel.noalpha.usrcnf=false
ro.config.emailanr_support=true
persist.radio.no_wait_for_card=1
ro.config.color_temperature=true
ro.hwpp.sms_block=true
ro.config.hw_omacp=1
ro.mmi.factory_normal_share=true
ro.config.glove_file_path=/sys/touch_screen/glove_func/signal_disparity
ro.config.hw_testingsettings=true
ro.config.show_battery_id=true
ro.mmi.otg.mount.path=/storage/usbotg
ro.config.toolbox_port_column=4
ro.config.toolbox_port_row=3
ro.config.toolbox_land_column=8
ro.config.toolbox_land_row=2
ro.config.do_sdcard_upgrade=true
ro.config.browser_agent=true
ro.config.video_pause_enable=1
ro.config.hw_camera_davinci=true
hw_internal_sd=false
ro.config.hw_multifocus_mode=false
ro.product.playreq.range=false
ro.product.streaming.custom=false
ro.config.hw.security_volume=8
ro.config.hw_dsda_phone=true
ro.mmi.mn.gyroscope=false
ro.mmi.as.gyroscope=false
persist.hw.power.shutdown=1
ro.mmi.ms.gyroscope=false
ro.mmi.aas.gyroscope=false
ro.config.camerarc=true
ro.config.hw_directly_callfdn=false
ro.config.hw_RemindWifiToPdp=true
ro.config.hw_browser_operator=3
ro.config.show_mms_storage=false
ro.config.hw_camera_davinci=true
ro.config.hw_camera_smartae=false
ro.config.hw_auto_scene=true
ro.config.hw_privacymode=true
ro.config.usesEncodingDetector=1
ro.config.launcher_matchcard=0
ro.config.qcom_wapi=true
ro.hwcamera.jpeg.quality=95
dalvik.vm.heapidealfree=8388608
net.webkit.cache.size=12582912
ro.config.show6130=true

ro.build.version.incremental=C17B360

ro.build.tags=release-keys

ro.build.description=G620S-UL00-user 4.4.4 GRJ90 C17B360 release-keys

ro.build.fingerprint=Huawei/G620S-UL00/hwG620S-UL00:4.4.4/HuaweiG620S-UL00/C17B360:user/release-keys

ro.build.display.id=G620S-UL00V100R001C17B360_KangVIP

ro.confg.hw_appsbootversion=G620S-UL00V100R001C17B360_APPSBOOT

ro.confg.hw_systemversion=G620S-UL00V100R001C17B360_SYSTEM

ro.confg.hw_recoveryversion=G620S-UL00V100R001C17B360_RECOVERY

ro.confg.hw_bootversion=G620S-UL00V100R001C17B360_KERNEL

ro.confg.hw_sbl1version=G620S-UL00V100R001C17B360_BOOT

LG G3 Keyboard.for AOSP Lollipop

$
0
0

The new keyboard from LG G3 is now available for Android devices running Lollipop (Android 5.0) or higher. This is a port which has been released by senior XDA member fLipz. The port has been successfully tested on a number of Android devices including Nexus 5, Galaxy S5 and Galaxy Note 3.

Video:
LG G3 Keyboard Preview

How to install LG G3 keyboard
Download LG G3 Keyboard
Copy the downloaded file to the internal/external SD card of your device
Reboot the phone into recovery mode
Perform Wipe cache and dalvik cache
Install the keyboard
Perform Wipe cache and dalvik cache
Reboot the phone

When the device reboots successfully, it should have the LG G3 keyboard.

Note: After installing the keyboard, navigate to Settings>> Language & Input, from there select Default Keyboard to LG.

If the keyboard force closes, then go to Settings>> Apps and clear data of LG keyboard.

Viewing all 817 articles
Browse latest View live